![]()
|
Improvements on Hanse 370e Bäsk (former
Hutschalange) Some of the improvements made on former S/Y Hutschlange, now S/Y BÄSK. S/Y Hutschlange was very much used for racing. After we acquired her in 2014 we re-named her to S/Y BÄSK and made some modifications for cruising.
|
|
|
Nickname on MyHanse: Borjebus |
|


1. We installed a bow thruster (RMC
Swingthruster) and an aft platform including cassette ladder and it was
worth every penny. In the picture you can see the three pieces of teak
we added to the aft “deck” and how we used a lot of heavy stuff while
gluing it. |
|


2. In 2015 we decided to replace all
exterior textile and ordered from Kapell & Annat, in dark blue color, a
sprayhood, a cockpit tent, a lazybag (in one piece, no separate mast
part) and a pedestal cover. |
|
 |
 |

|

|

|

|
|
3. We needed
quite a big cockpit table. We made a sketch and had a carpenter to make
it in teak. The brackets for the pedestal is standard one from Hjertmans
and the support leg comes from IKEA. |
|
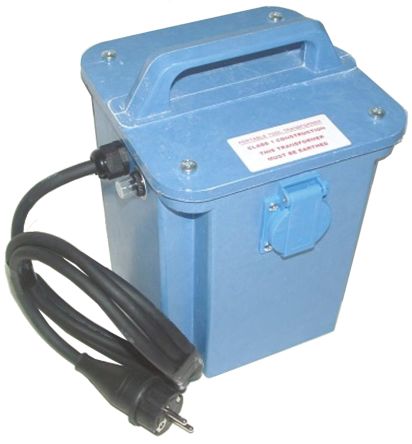 4. As we have the boat in water also during winter and we use shore power in our home harbor we need an isolation transformer to ensure the boat in not harmed by vagabond current. As it is a quite heavy device we wanted to place it on the starboard side, towards the front. We ended up using the front most small storage under the starboard couch. In order to get the cables to/from the transformer we had to remove both the storage in front of the sink, and the battery box. The solution is good and didn’t cost too much money. The only disappointment is perhaps the 50 Hz “noise”. Link to the product, Click here! Picture borrowed from RS Components AB |
|
|
The hour counter in the rpm meter stopped showing hours also for us. Albin Motor helped us to get a new, Italian one, that Yanmar guaranteed to work. In order to get the new one to show the correct hours (628) I made a small pulse generator, connected it to the new rpm meter and ran it for 628 hours in the winter (at home). We also replaced the plastic front so now the motor control panel looks as new. |
|
|
We talked about my problem with installing 230V to the
front cabin. The picture shows what it looks like behind the port
wardrobe in the front cabin. |
|
 Ventilation of the refrigeration compressor is a recurring topic on myhanse.com. I have, so far, only put grilles in the cupboard and in the door. |
 Would think that there will be fan-driven ventilation before the next season, and possibly new supply cables (just read about someone who got a voltage drop due to irritated cables) with good area. |
|
We replaced the old Simrad DS34 with a B&G Vulcan and to make a new Navpod to fit we hade to modify the pedestal pipes. The result is really nice. At the same time we replaced the GPS antenna with a B&G ZT 100 containing both GPS receiver and a compass. This gives us fine redundancy for GPS and compass. We have also replaced the old, analogue, speed/temp sensor with a new Airmar speed/depth/temp sensor with NMEA 2000 connection. Unfortunately some of the old instruments refuse to read speed from this sensor. If I can’t succeed we will have to replace some IS12 instruments with B&G Triton |
|
 5. Last summer we had an incident. In shallow waters we went aground. In less than 3 knots we hit a rock. I almost succeeded to steer away but unfortunately we hit in about 45 degree angle. One meter more and we would have been clear. It was bad seamanship to sail in these waters – I trusted my plotter too much, and when the fix point disappeared (has happened many times) I was lost. Luckily we had no visible damages on the inside and no leakage. We lifted the boat and noticed that the joint between steel and lead was damaged due to the 45 angle crash. It seems as the top of the lead part had a lot of iron that was rusty (brown) and un-solid. No workshop could repair but Hanse in Greifswald made a new keel. |
 The keel is now equipped with a “bumper” called Keel Pro as extra safety in the future. It also renders a discount on the insurance fee. |
 The previous owner replaced a lot of blocks to Harken ones, and we have continued these upgrades. In order to get rid of the weak Lewmar block for main halyard we made new 14 mm pins with 8 mm holes. |
 The base plate was removed and we drilled the pin holes to 14 mm. With 8 mm pin holes we had a lot of nice blocks to choose from. |

What I did was: 2) I drilled all the bolt holes up to 14 mm, plus some margin. 3) I manufactured new 14 mm bolts with 8 mm hole. 4) When I re-attached the base plate I secured that no Sikaflex touched the lower part of the bolts – I actually put some grease there. 5) With 8 mm holes for all bolts I could replace the blocks I needed to increase in size. |
|
|
The damages on my base plate was not near the ones we can see in the pictures above (Samuel), and my boat is a 370 that has gone offshore racing. Nothing is stronger than the weakest link of the chain, and in my case I believe it’s now the base plate material that is the weakest part. |
|
 Sparcraft offered another solution, see picture below, where the bolts are replaced with stainless steel rails. For this solution you can use standard blocks with shackles. The problem on my boat is that the blocks comes too high and the sheets don’t come under the garage (bad angle). |
 |


