![]()
|
Mast top extension 2018-05-05 As we had bought a new main sail that had a bigger "rounding" in the back, our back stay chafed on the sail always when the winds were weak. This was a problem that a fellow Hanse owner had on his boat too so he went to the drawing board and designed a new mast top extension that would move the backstay 135 mm out from the top of the mast. This eliminated the chafing to a certain level but not fully. In hindsight a 150 mm might been better. The fitting is very easy even if you do it like we did it, when the mast was on the boat. I still recommend that you do it when the mast is off the boat so you do not have to worry about falling tools and nuts. As the pictures are quite self explanatory there will not be so much text to this subject. If you are interested in this product, please contact Ulf Suhr at ulf.suhr(at)me.com who is the constructor of the mast top extension.
|
|
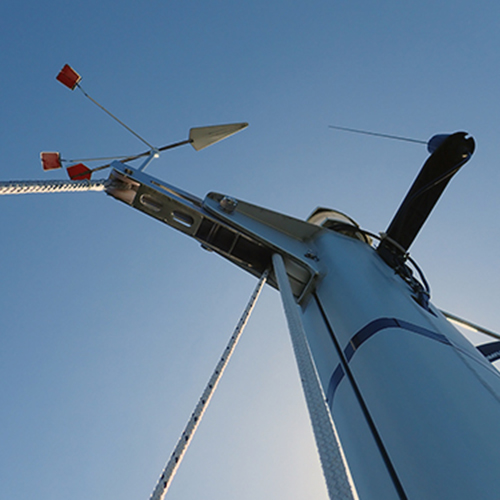 1. Just a view from down under... |
 2. The Extension fits perfectly in the bolt that supported the back stay. |
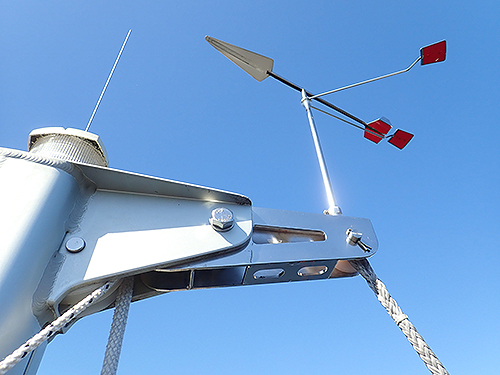 3. The wind vane is moved to the end of the extension. |
 4. The new backstay bolt is secured only with a pin. Makes it easier and requires less tools to handle. |
 5. Just in front of the mast top light there is a hex bolt that secures the extensions top to the mast top. This is the only new hole you need to drill on the mast. |
 6. As the gap is quite wide in the end of the extension, we drilled some sheaves from an IKEA nylon cutting board to make the gap narrower. |