Home
Anchor well
Anchor windlass
Autopilot
Backstay
Bow anchor and chain roller
Bow protector
Bowsprit
Checklist
Cockpit storage covers
Cockpit table
Cockpit tent
Cooker and oven
Electrical parts
Electric panels
Equipment and measures
For sale
For sale Hanse spare parts
Fridge ventilation
Heath pipe insulation
Impeller change
Improvements by others
Jibs outhaul block
Lock companionway
Links
Logosticker
Lounge extension
Mainsheet traveller
Manuals
Mastfootblocks
Mast top extension
Pictures
RAL color codes
Rig
Rope terminals
Rudder
Sails - Code Zero
Sails - Jib
Sails - Main
Saloon lamps
Saloon table stand
Showerdoor clasp
Snatchblocks for Code Zero
Spare parts
Spalshguard
Sprayhood
Swimming platform
Swinglift
Technical specifications
Tips
Vang
Videos
Wanted
Water boiler
Water tank key
Windlass aft
Winsches
Yanmar engine 3JH4E
Yanmar saildrive SD50
 SD50 clutch lapping
 SD50 oil seal replacement
 

Optimized for 1024 x 768

(C) C.D.G 2009-2023

Uppdated 2023-01-29

Mail to webmaster

Fixing the Yanmar SD50 clutch slipping problem (Clutch Maintenence)

UNDER CONSTRUCTION


Please watch these videos on Youtube before you start working with the clutch as the films gives you a better visual description for some aprts of our text below.

Film 1: Yanmar SD 50 Clutch Maitenence. https://www.youtube.com/watch?v=M4EwhbRHvvE

Film 2: Yanmar SD40 / SD50 Saildrive Upgrade. https://www.youtube.com/watch?v=ov1c6E3lcAM&t=932s

Folm 3: SAILDRIVE UPGRADE KIT fixes more than one problem! - Episode 48. https://www.youtube.com/watch?v=4TrROns2Eh4&t=309s


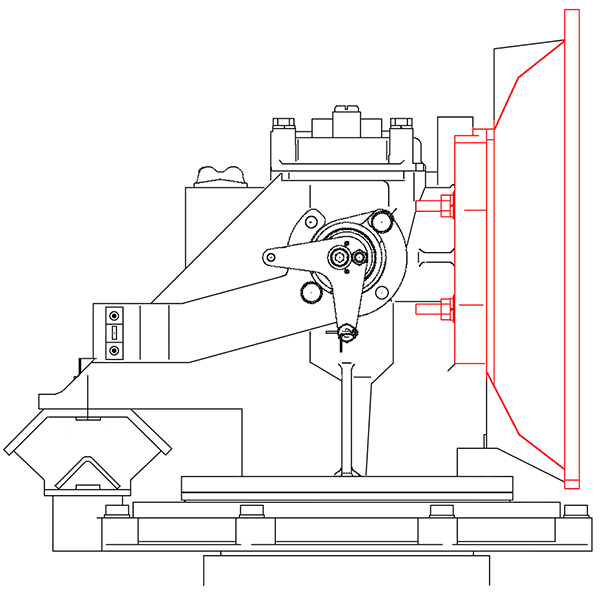
A general overwiev of the xxx part of the SD50


1. Removing the clutch oil

Tools: Fingers or a wrench/pliers to open the yellow cap.

1a. Start by removing the cap on the oil supply port and use an oil pump to remove about 0,2 to 0,3 liters of oil. Check the quality of the oil when you are done pumping.


2.Removing the gear casing cover

Tools: 13 mm socket or spanner wrench

2a. Untighten the 4 screws on the top of the cluth house and pull out the bolts. Watch out that you dont drop the lock washer on each of the bolts

2b. Lift the cover carefully as there is a o-ring inside. Be also carefull with the o-ring so you dont loose it or damage it.

2c. There might also be a shimm underneath (on S/y Älva there was no shimm). Don't lose the shim and dont bend it.

You can also just let the casing cover stay in its place after unscrewing the bolts as you will now move to next step and its better if you protect the clutch from geting dirty.


3. Releasing the shift leaver

Tools: 13 mm socket wrench

mark with a marker pen so you know where to re-aligne the sifter

theres is a spring inside so the lever is popping out

open the two bolts, be carefull that you dont drop the lock washers. These two blots are slightly shorter than on the cover so its easy to know which belongs to whic part if you happend to mix them.

Look at the gear shifter inside and be sure that you know which side is to the front and which is to the aft .See Film 3 at time 18:10.

4.Moving the axis from the bellhouse

Tools: a hammer and something solid but "soft" to put agains the bolt and nut so they will not get damaged.

4a. Start by measuring how many mm the bellhouse bolts are sticking out from the bellhouse before you start unlocking the nuts. This is important to know when you are tightening the nuts back and need to know if you have managed to pull the axis inside the bellhouse back to its place.

4b. Use ring spanners to untighten the 4 nuts (2 on each side of the engine) all the way to the top of the bolt but do not remove them as you will need the bolts to stop the axis moving too far inside the bellhouse. The nuts are also perfeckt for protecting the threads when you tap on the bolts.

4c. Use a soft hammer and a piece of wood to tap the bolts into the engine. Do the tapping equally on both sides so it will not get jammed. Baby steps is to be recommended.

4d. When the nuts has been tapped all the way into the bellhouse go to step 5.